


 I recently lamented to my husband that I wish I was good at pumpkin carving. You know, like really good-the kind of pumpkin carver who can shave various parts of pumpkin flesh, but not pierce through, concocting intricate masterpieces of shadows and light. The kind of pumpkin carver that is truly Pinterest-worthy. You know the type I’m talking about! My husband brought me back to reality: “Why would you want to be good at something that matters only one day out of the year? Who cares? Be good at something the other 364 days!” Ha! So true. I could purchase all the tools, watch YouTube videos, stress out, mess up quite a few pumpkins in my perfect-pumpkin-sculpting-attempts. . . but really, I’m just not that patient.
If, like me, you tend to end up carving the same basic jack-o-lantern year after year, try your hand at these kid-friendly, no-carving-required projects. If I can do them, trust me, you can, too!
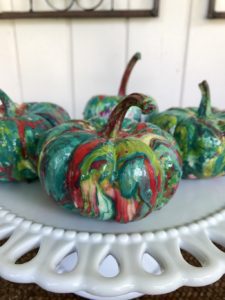
Psychedelic Swirls
This one is incredibly easy and turns out so beautiful and shiny! What you’ll need:
- mini pumpkins
- fingernail polish (various shades)
- a (disposable) bowl filled with water (2/3 full)
- gloves (learned that the hard way)
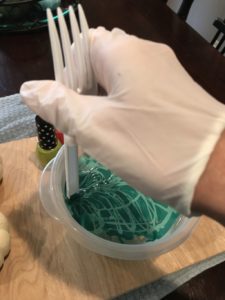 Drip the polish into the bowl of water and swirl it around (I used a plastic fork, but anything from a cotton swab to a stick will do just fine.)
- Holding the pumpkin stem, dip the pumpkin in, bring back out and set on its side (stem-side down) to dry.
- Drip more fingernail polish in the bowl and continue with remaining pumpkins.
- After the pumpkin bottoms have dried about 15 minutes, put your gloves back on and start again, this time, plunging the pumpkins in stem-side first.
NOTE: Be sure to wear protective gloves! I wore gloves for the first series of dips, but the second dip, I thought, “Nah, girl, you got this!” Mmmmm … wrong. Three days and a nail-polish-remover bath later, I’ve still got polish remnants on my hands!
Also, do this in a well-ventilated area! The fumes about killed me!
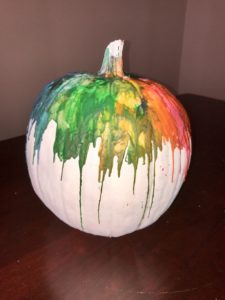
Crazy Crayon Melt Mashup
I LOVE how this turned out, and my daughter enjoyed helping! You’ll need:
- a pumpkin
- white paint and a large paintbrush
- broken crayons, paper removed (you know you’ve got tons lying around your house!)
- hot glue gun
- a hairdryer
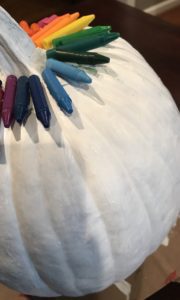 Paint your pumpkin white (or any color you choose–just know the crayon colors will show up better on a surface lighter than pumpkin-orange).
- Once the paint dries, glue broken crayons around the stem. I used a rainbow-colored pattern, but any pattern will do. It might be fun to test out variations, like your favorite sports team’s colors.
- Take out your handy-dandy hairdryer and go to town on those little crayons until they’re completely melted all around the pumpkin. It took me about 10-15 minutes to get the look just right.
NOTE: Who knew? Hot melting wax combined with a high-powered hairdryer makes a ginormous mess. If you don’t want your dining room table to look like a splatter-paint Jackson Pollack painting (oops!), do this in your garage or someplace FAR away from furniture, rugs, clothes, hardwood floors — you get the picture! BUT the good news is, I did learn that the wax dries quickly and can be scraped up piece. . . by piece. . .by piece. . .by piece. Anything for the sisterhood of the Birmingham Mom Collective, am I right?! 😉
Drill Happy
Why haven’t I done this before? So easy and so professional-looking! What you’ll need:
- A pumpkin
- A power drill and bits (various sizes)
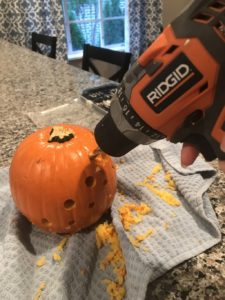
- Cut a hole in the bottom of the pumpkin and scoop out the seeds.
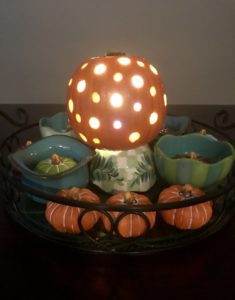
- Test out various drill bit sizes and start making designs on your pumpkin: polka dots, flowers, Mickey Mouse — anything round — the sky’s the limit!
- Set your hollowed-out pumpkin atop a candle, and voilà! Easiest pumpkin decorating ever!
Hey, Mrs. Pumpkin Head
Still need one more non-carving pumpkin decorating idea? Buy one of these wooden mix-and-match sets. How easy is that? And fun for the kids to use year after year!
What are your favorite pumpkin decorating hacks? Share in the comments below — I’m always up for new ideas!
")


